

This blog post is about 3 ways to run kubernetes on your local machine and resolve DNS. For example, if you want to access the following domain pointing on an nginx: nginx.test.hack
Problem
Very often, when I want to iterate quickly and test things locally in kubernetes, I need a local environment to be able to move fast with adapting my /etc/hosts file as described in the following articles:
- https://opensource.com/article/20/11/run-kubernetes-locally
- editing etc/hosts file
- kind metalllb: https://mauilion.dev/posts/kind-metallb/
However, I wanted a solution with automatic local DNS, or even configure it once.
Solutions
Via brew, we install our dependencies. For every example, we need kubectl
brew install kubernetes-cli
So let’s get going into the 3 examples.
orbstack
What is orbstack?
OrbStack is the fast, light, and easy way to run Docker containers and Linux. Develop at lightspeed with our Docker Desktop alternative.
And it gives you loadbalancer and ingress out-of-the-box. See here for details. Ok, let’s install
brew install orbstack
and start it. Additionally, we need to enable kubernetes, as shown in the following image:
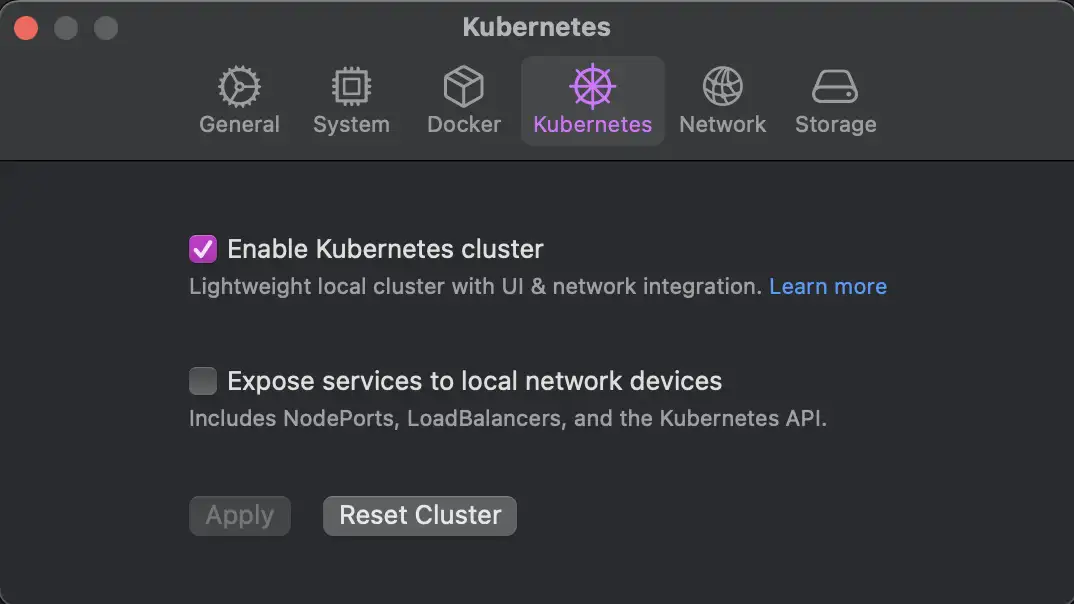
After it is up and running 🏃, let’s go through the steps to be able to successfully run curl -I nginx.k8s.orb.local in the end.
Here we go:
# use the right k8s context
kubectl config use-context orbstack
# create nginx ingress
kubectl apply -f https://raw.githubusercontent.com/kubernetes/ingress-nginx/controller-v1.10.1/deploy/static/provider/cloud/deploy.yaml
# and wait until it is rolled out
kubectl rollout status deployment -n ingress-nginx ingress-nginx-controller --timeout=30s
# now create the deployment, svc
kubectl create deploy nginx --image=nginx
kubectl rollout status deployment nginx --timeout=10s
kubectl expose deploy/nginx --type=NodePort --port=80
sleep 3 # wait until the service is exposed
# then create the ingress
kubectl create ingress nginx --class=nginx --rule="nginx.k8s.orb.local/=nginx:80"
# now use it √
curl -I nginx.k8s.orb.local
# after you're done, delete all resources
kubectl delete ingress,svc,deploy nginx
kubectl delete -f https://raw.githubusercontent.com/kubernetes/ingress-nginx/controller-v1.10.1/deploy/static/provider/cloud/deploy.yaml
If you might be wondering, how this look in action, here we go 🎉 (btw. proudly created with vhs ❤️)

Now if we want to have multi-node clusters and customize other cluster features, we will use kind, which is also mentioned here, or if we cannot use or stack due to various reasons, such as licensing 📃 and/or cost 💰
Let’s hop on more customization with kind which is kubernetes-in-docker.
kind and nip.io
Using the DNS service nip.io in combination with docker-desktop
Stop editing your etc/hosts file with custom hostname and IP address mappings.
This is exactly what nip.io allows us to do. This blog explains the setup. Now, we combine it with our use case.
First up, let’s install the needed binaries:
brew install kubernetes-cli kind
Next up are the the steps to set it up. They are similar to the one for orbstack in the previous section. So, I will leave out the comments. The goal is to be able to successfully run the following command: curl -I nginx.$MY_IP.nip.io
Before we jump right in, here is the kind-nipio.yaml config. We need to configure kind correctly for our use case.
kind: Cluster
apiVersion: kind.x-k8s.io/v1alpha4
nodes:
- role: control-plane
  kubeadmConfigPatches:
  - |
    kind: InitConfiguration
    nodeRegistration:
      kubeletExtraArgs:
        node-labels: "ingress-ready=true"
  extraPortMappings:
  - containerPort: 80
    hostPort: 80
    listenAddress: 0.0.0.0
    protocol: TCP
  - containerPort: 443
    hostPort: 443
    listenAddress: 0.0.0.0
    protocol: TCP
Now, with this given configuration, we can spin up the kuberneter cluster and verify our approach as follows:
export MY_IP=$(ipconfig getifaddr en0)

kind create cluster \
  --name nipio \
  --image kindest/node:v1.29.2 \
  --config kind-nipio.yaml \
  --wait 1m

kubectl config use-context kind-nipio
kubectl -n kube-system rollout status deploy coredns --timeout=15s
# create nginx ingress
kubectl apply -f https://raw.githubusercontent.com/kubernetes/ingress-nginx/controller-v1.10.1/deploy/static/provider/kind/deploy.yaml
kubectl rollout status deployment -n ingress-nginx ingress-nginx-controller --timeout=30s

kubectl create deploy nginx --image=nginx
kubectl rollout status deployment nginx --timeout=10s
kubectl expose deploy/nginx --type=NodePort --port=80
sleep 3 # wait for the nodePort to be exposed
kubectl create ingress nginx --class=nginx --rule="nginx.$MY_IP.nip.io/=nginx:80"

curl -I nginx.$MY_IP.nip.io
# cleanup
kubectl delete ingress,svc,deploy nginx
kubectl delete -f https://raw.githubusercontent.com/kubernetes/ingress-nginx/controller-v1.10.1/deploy/static/provider/kind/deploy.yaml
kind delete cluster --name nipio
And again, if you might be wondering how this look in action, here we go 🎉 again (this time proudly created with other tools such as asciinema and agg ❤️)
That’s great 🎉 And now you might be wondering what to do if you want to use your own local domain (which is not blocked or a TLD), for example .hack? This is what we will do in the next section. Here we go.
kind and dnsmasq
As we already got to know kind in the previous section, now we will set it up with local networking for a .hack domain with dnsmasq.
Dnsmasq provides network infrastructure for small networks: DNS, DHCP, router advertisement and network boot. It is designed to be lightweight and have a small footprint, suitable for resource constrained routers and firewalls.
Therefore, we need the following binaries installed
brew install kubernetes-cli kind dnsmasq
Before I did some research and combined the knowledge of those 3 resources
- https://mjpitz.com/blog/2020/10/21/local-ingress-domains-kind/
- https://gist.github.com/ogrrd/5831371
- https://allanphilipbarku.medium.com/setup-automatic-local-domains-with-dnsmasq-on-macos-ventura-b4cd460d8cb3
Ok, now let’s see what the code looks like 🤓
# register .hack TLD locally
echo "address=/.hack/127.0.0.1" >> $(brew --prefix)/etc/dnsmasq.conf
# yes with sudo
sudo brew services start dnsmasq
# now we use the local dns server to test if it can resolve the local TLD
dig @127.0.0.1 test.hack
# configure the local resolver to let the nameserver entry
# for the TLD point to the local DNS server
sudo mkdir /etc/resolver/
cat <<EOF | sudo tee /etc/resolver/hack
nameserver 127.0.0.1
EOF
# restart mDNSResponder
sudo killall -HUP mDNSResponder
# verify the new resolver was picked up
scutil --dns
# ... should show
resolver #8
  domain   : hack
  nameserver[0] : 127.0.0.1
  flags    : Request A records, Request AAAA records
  reach    : 0x00030002 (Reachable,Local Address,Directly Reachable Address)

# now we test it with a subdomain
ping -c 1 test.sub.hack
# ...
PING nginx.sub.hack (127.0.0.1): 56 data bytes
64 bytes from 127.0.0.1: icmp_seq=0 ttl=64 time=0.052 ms

--- nginx.sub.hack ping statistics ---
1 packets transmitted, 1 packets received, 0.0% packet loss
round-trip min/avg/max/stddev = 0.052/0.052/0.052/0.000 ms
After the baseline network is set up, we can now proceed to the kubernetes with kind. Therefore we need an
adapted configuration kind-dnsmasq.yaml as follows:
kind: Cluster
apiVersion: kind.x-k8s.io/v1alpha4
nodes:
- role: control-plane
  kubeadmConfigPatches:
  - |
    kind: InitConfiguration
    nodeRegistration:
      kubeletExtraArgs:
        node-labels: "ingress-ready=true"
  extraPortMappings:
  - containerPort: 80
    hostPort: 80
    listenAddress: 127.0.0.1 # <- point to the local DNS server
    protocol: TCP
  - containerPort: 443
    hostPort: 443
    listenAddress: 127.0.0.1 # <- here as well
    protocol: TCP
Great 💡. So, let’s create the cluster and get this up and running:
# make sure the DNS is up
sudo brew services restart dnsmasq

kind create cluster \
  --name dnsmasq \
  --image kindest/node:v1.29.2 \
  --config kind-dnsmasq.yaml \
  --wait 1m

kubectl config use-context kind-dnsmasq
kubectl -n kube-system rollout status deploy coredns --timeout=15s
kubectl apply -f https://raw.githubusercontent.com/kubernetes/ingress-nginx/controller-v1.10.1/deploy/static/provider/kind/deploy.yaml
kubectl rollout status deployment -n ingress-nginx ingress-nginx-controller --timeout=30s

kubectl create deploy nginx --image=nginx
kubectl rollout status deployment nginx --timeout=10s
kubectl expose deploy/nginx --type=NodePort --port=80
sleep 3 # to be exposed
kubectl create ingress nginx --class=nginx --rule="nginx.test.hack/=nginx:80"

# use it √
curl -fI nginx.test.hack

HTTP/1.1 200 OK
Date: Wed, 27 April 2024 05:35:01 GMT
Content-Type: text/html
Content-Length: 615
Connection: keep-alive
Last-Modified: Tue, 16 Apr 2024 14:29:59 GMT
ETag: "661e8b67-267"
Accept-Ranges: bytes

# cleanup
kubectl delete ingress,svc,deploy nginx
kubectl delete -f https://raw.githubusercontent.com/kubernetes/ingress-nginx/controller-v1.10.1/deploy/static/provider/kind/deploy.yaml
kind delete cluster --name dnsmasq
# if you want, stop also the DNS service
sudo brew services stop dnsmasq
And again, how this looks in action:

Conclusion
🎉 that’s it. I intended to show different ways you can set up your local cluster with DNS resolving. In a future post, I’ll use one of the setups to run GitLab locally, even with SSL. Stay tuned!
Sitenote: for presenting, I discovered the tool vhs, and for the second cast, I used a combination of the tools asciinema and agg
You can create a cast yourself as follows:
brew install asciinema agg
asciinema rec kind-nipio.cast
agg -v --rows 25 kind-nipio.cast kind-nipio.gif
Enjoy ❤️
Like what you read? You can hire me 💻, book a meeting 📆 or drop me a message to see which services may help you 👇